It’s National Quilting Day and I have a Carpenter’s Star tutorial to share with you. For the Rainbow Scrappy Challenge at So Scrappy, I’ve been making these blocks as my primary project. Star blocks are my favorites and I’m always looking for new ways to make them. For the challenge, I wanted to use 2-1/2” strips since I have a million of them, but needed everything to coordinate since there is 30 years of fabric accumulation in my stash. I use the Omnigrid 96 ruler to cut the half square triangles (HST). If you don’t have the 96 you can use any other ruler that enables you to cut HST from strips (like the Easy Angle). After playing around in EQ7 for a while, I came up with this version of the Carpenter’s Star that uses four print strips, a contrast fabric and a background.
In a traditional Carpenter’s Star block, the middle “circle” between the stars is background. By using a constant color, in this case teal, I could control the scrappy-ness and tie all the different colored blocks together. For my quilt, it was important to be able to cut all the half square triangles from 1 strip of each print since that’s typically all I have in the scrap bins. What’s also nice is you can make this block from jelly roll strips if you don’t have a stash.
I love the color teal and it coordinates with pretty much every color so that is the control (contrast) fabric for all my blocks. I’m using a few different teal fabrics, assorted backgrounds and of course, scrappy color prints each month according to the challenge selection. In January we used purple, February was aqua and this month is red.
The first month it took forever to make the blocks, but now I have streamlined the process and can piece them much more quickly. This tutorial will help you make the block efficiently too!
Fabric requirements for each block:
Four different 2-1/2” x WOF strips of print fabric. Since I’m doing this quilt for the Rainbow Scrappy Challenge, my strips are monochromatic but I try to use two lighter and two darker strips.
Two 2-1/2” x WOF each of background and contrast fabrics.
It really helps to make a color card to keep your fabrics straight.
Cutting:
I layer my fabrics right sides together (RST) before cutting so they are ready to feed through the machine and I don’t have to spend time matching the correct halves and aligning them.

I cut four layers at a time so I layer the strips this way: BG strip right side up, Fabric #1 right side down, BG strip right side up and Fabric #3 right side down.
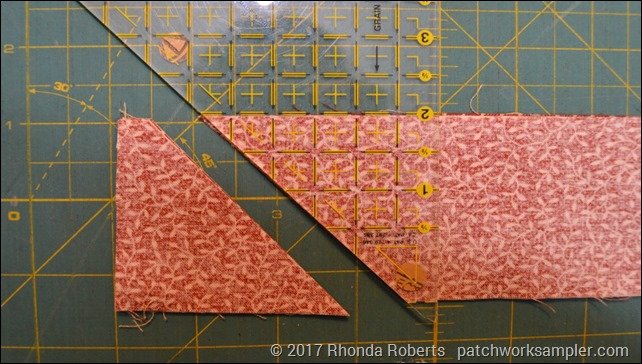
Position your ruler with the 2” line along the bottom of the strips. The top of the Omni 96 has a dashed line. This should align with the top of your strips.
Cut along both the left and right sides of the ruler. Rotate the ruler 180 degrees and make the second cut.
Continue rotating and cutting until you have four sets of HST.
Right away, I chain piece these units through the machine so they don’t get lost or separated. Sew the units with a scant 1/4” seam along the diagonal side. Press all seams toward the background fabric.
Now layer the following strips and cut four sets of HST just like above:
BG strip right side up, Fabric 2 strip right side down, BG strip right side up, Fabric 4 strip right side down.
Sew these units together and press the seams toward the print fabrics. You will end up with sixteen HST triangle units that look like this:
Now you will repeat this process using the contrast strips instead of background strips. Layer contrast strip right side up, Fabric #1 right side down, contrast strip right side up and Fabric #3 right side down and cut four sets of HST. Sew units together and press toward the contrast fabric.
Next, layer contrast strip right side up, Fabric 2 strip right side down, contrast strip right side up, Fabric 4 strip right side down and cut four sets of HST. Sew units together and press toward the print fabrics.
You will have HST sets that look like this:
Now, you will layer strips like this and cut four sets of HST:
Fabric 1 right side up, Fabric 2 right side down, Fabric 3 right side up and Fabric 4 right side down. Sew these units together and press toward Fabrics 2 and 4.
For the last sets layer these strips and cut four sets of HST:
Fabric 1 right side up, Fabric 4 right side down, Fabric 3 right side up and Fabric 2 right side down. Sew these units together and press toward Fabrics 2 and 4.
Now you should have HSTs that look like this:
The last little bit of cutting is eight 2-1/2” squares of BG and contrast fabric.

Now the fun begins. Since this is a 16” finished block you will need a pretty big space to lay out the units. It also helps if you can easily move them over to your sewing machine to sew the units together. I use a large block board made from a piece of foam core purchased at the Dollar Tree wrapped in a leftover piece of batting. It’s cheap, lightweight and easy to move from the cutting table to the ironing board to the sewing machine.
It takes some concentration to lay this block out correctly. Use this diagram to help you position the triangle units.
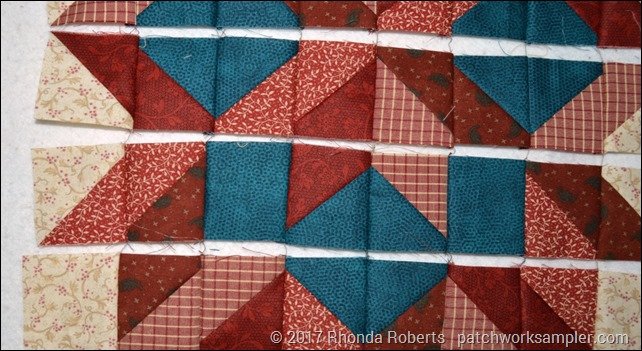
It helps to remember that fabrics go sequentially clockwise around the outer star and counter clockwise in the inner star. Once you have the correct block placement it’s time to sew the block together. It helps me to “web” the block so I don’t inadvertently get the units turner around. In order to do this, I chain piece the columns together into rows. Simply flip the units in column 2 right sides together over the units in column 1 and sew them together. Don’t cut the threads between the rows. Add the column 3 units, then column 4 and so on until all the rows are complete. When you finish your block will be held together by thread like this.
You can see the threads better in the close-up here:
If you don’t understand the webbing process, Bonnie Hunter at Quiltville has a great tutorial on her website here. She webs her quilts together, but it’s the same process for the block.
Now you just have to sew the rows together to complete the block. This is how your finished Carpenter’s Star block should look.
Your block should measure 16-1/2” square at this point and will finish at 16” square.
If you make this block, send me a picture so I can see it!
Today is the Show and Tell day for the Rainbow Scrappy challenge so I’m linking up. Be sure to check out all the other colorful projects here.


I absolutely love this design. Almost an optical illusion due to the 3-dimensional look. Even with your detailed instructions I know this is way beyonder my capabilities. You are so very talented.
This is such a gorgeous block!
That’s gorgeous! The teal is such a good colour. Carpenters Wheel is at the top of my scrappy list. I didn’t realise that you sew it in rows.
Thanks for the tutorial and your RED block turned out GREAT!!
What a great tutorial, Rhonda. You sure put some time into it, and it’s very clearly explained. Can’t wait to try this. Im pretty sure, though, that I’ll be getting something mixed up somewhere along the way. I guess that’s what seam rippers are for.
I am definitely going to make this. Thank you for the tutorial. It would make great pillow or a bag for carrying anything and everything,
I’m loving your block. Thanks for the tutorial!
Very nice tutorial of a way of cutting this that I haven’t tried. My favorite size is to make one like this in baby size, using 5 or 6 inch squares to start. Fast baby quilt, and so pretty!
Great red block!